
HOMER
Software for motif discovery and next-gen sequencing analysis
Mapping reads to the genome
Once you have checked your FASTQ files and have removed all
adapter sequences that might be present, you are ready to
map them to a reference genome. While tools like BLAST
and BLAT are powerful methods, they are not specialized for
the vast amount of data generated by next-generation
sequencers. It is highly recommended that you use a
next-gen specific read alignment program.Note: While BWA, Bowtie, and Tophat have received the most attention as short read alignment algorithms, new methods such as STAR are significantly faster and in some cases more accurate. More like it are likely to come along soon (if not already available...)
Selecting a reference genome
- Do you have a favorite genome in the lab that already has a bunch of experiments mapped to it? Use that one.
- Do any of your collaborators have a favorite genome/version?
- Use the latest stable release - I would recommend
using genomes curated at UCSC so that you can easily
visualize your data later using the UCSC Genome Browser.
(i.e. mm9, hg19)
Mapping to a normal genomic reference
You want to map your reads directly to the genome if you are performing:
- ChIP-Seq
- GRO-Seq
- DNase-Seq
- MNase-Seq
- Hi-C
Popular short read aligners
Most Popular:
bowtie : fast, works well
bowtie2 : fast, can perform local alignments too
BWA - Fast, allows indels, commonly used for genome/exome resequencing
Subread - Very fast, (also does splice alignment)
STAR - Extremely fast (also does splice alignment, requires at least 30 Gb memory)
To be honest, I would probably recommend STAR for almost any application at this point if you have the memory (see below)
Example of alignment with bowtie2:
Step 1 - Build Index (takes a while, but only do this once):
After installing bowtie2, the reference genome must first be "indexed" so that reads may be quickly aligned. You can download pre-made indices from the bowtie website (check for those here first). Please be aware that bowtie2 indexes are different than "bowtie" indexes. To perform make your own from FASTA files, do the following:
- Download FASTA files for the unmasked genome of interest if you haven't already (i.e. from UCSC). Do NOT use masked sequences. I also tend to remove the "*_random.fa" chromosomes. These often contain part of the canonical chromosomes in addition to regions that cannot be placed in the assembly. The problem with these regions is that the part shared with the canonical chromosome will be present twice, making it difficult to map the reads to a unique location.
- Concatenate FASTA files into a single file. We can do this using the UNIX cat command, which merges files together
cat *.fa > genome.fa
- From the directory containing the genome.fa file, run the "bowtie2-build" command. The default options usually work well for most genomes. For example, for hg19:
/path-to-bowtie-programs/bowtie2-build genome.fa hg19This command will create 6 files with a *.bt2 file extension. These will then be used by bowtie2 or newer versions of tophat to map data.
- Copy the *.bt2 files to the bowtie2 indexes directory (or somewhere you can store them) so that bowtie2 knows where to find them later:
cp *.bt2 /path-to-bowtie-programs/indexes/Step 2 - Align sequences with bowtie (perform for each experiment):
The most common output format for high-throughput sequencing is FASTQ format, which contains information about the sequence (A,C,G,Ts) and quality information which describes how certain the sequencer is of the base calls that were made. In the case of Illumina sequencing, the output is usually a "s_1_sequence.txt" file. More recently the Illumina pipeline will output a file that is debarcoded with your sample name such as "Experiment1.fastq". In addition, much of the data available in the SRA, the primary archive of high-throughput sequencing data, is in this format.
To use bowtie2 to map this data, run the following command:
/path-to-bowtie-programs/bowtie2 -p <# cpu> -x <genome index prefix> <fastq file> > <output filename>
i.e.
/programs/bowtie2 -p 8 -x hg19 Experiment1.fastq > Experiment1.sam
Where <genome index prefix> is the common prefix for the *.bt2 files that were created using the bowtie2-build command in step 1, or from a downloaded index. If the *.bt2 files are stored int the "/path-to-bowtie2-program/indexes/" directory, you only need to specify the name of the index. If the index files are located elsewhere, you can specify the full path names of the index files (in the examples above this would be "-x /programs/indexes/hg19").
In the example above, we use 8 processors/threads. The bowtie2 program is very parallel in nature, with near linear speed up with additional processors.
The default output is a SAM file. To learn more about SAM alignment files, go to the next section on SAM/BAM files.
There are many other options for bowtie2 that may be important for your study, but most ChIP-Seq data can be mapped using the default options.
NOTE: Usually, the process of removing duplicate reads or removing non-unique alignments is handled by the downstream analysis program.
Example of alignment with bwa:
Step 1 - Build Index (takes a while, but only do this once):
bwa index -a bwtsw genome.fa
Step 2 - Align reads to the index (perform for each experiment):
# where the genome.fa is in the same directory with your index from the first step
bwa mem -t #cpus genome.fa reads.fq > aln-se.sa
#paired end
bwa mem -t #cpus genome.fa reads1.fq reads2.fq > aln-pe.sam
Mapping to a genome while allowing splicing
Usually, any kind of RNA-seq method will benefit from looking for splicing junctions in addition to genomic mapping:
- RNA-Seq (polyA+, total)
- CLIP-Seq/PAR-CLIP
- RIP-Seq
- ChIRP-Seq
- Ribo-Seq
Popular splice read aligners
Tophat (most popular)
Subread - Very fast, (also does splice alignment)
STAR - Extremely fast (also does splice alignment, requires at least 30 Gb memory)
lots of others...
I would probably recommend STAR for RNA-Seq is you have enough RAM (see below)
Example of aligning RNA-Seq data with STAR (very very fast)
STAR is one of a growing number of short read aligners that takes advantage of advances in computational power to optimize the short read mapping process (original publication: Dobin et al.) The key limitation with STAR is computer RAM - STAR requires at least 30 Gb to align to the human or mouse genomes.
To install STAR, visit the website and follow their instructions.
Step 1 - Build a genome index
Like all aligners, you need to build the genome index first. The STAR website has links to the hg19 genome index if you want to skip this step. First, make a directory for the index (i.e. mm9-starIndex/). Then copy the genome FASTA file it the directory and cd into it to make that directory your current directory. Then, to build the index, the command is:
STAR --runMode genomeGenerate --runThreadN <# cpus> --genomeDir <genome output directory> --genomeFastaFiles <input Genome FASTA file>
i.e. STAR --runMode genomeGenerate --runThreadN 24 --genomeDir ./ --genomeFastaFiles mm9.fa
Note: For small genomes, you may need to add the following to create a proper index: "--genomeSAindexNbases 6"
Step 2 - Align RNA-Seq Reads to the genome with STAR
To align RNA-Seq reads with STAR, run the following command:
STAR --genomeDir <Directory with the Genome Index> --runThreadN <# cpus> --readFilesIn <FASTQ file> --outFileNamePrefix <OutputPrefix>
i.e. STAR --genomeDir mm9-starIndex/ --runThreadN 24 --readFilesIn Experiment1.fastq --outFileNamePrefix Experiment1Star
# paried-end data:
STAR --genomeDir mm9-starIndex/ --runThreadN 24 --readFilesIn read1.fastq read2.fastq --outFileNamePrefix Experiment1Star
STAR will create several output files - the most important of which is the "*.Aligned.out.sam" - you will likely want to convert this to a bam file and sort it to use it with other programs. The default output is a SAM file. To learn more about SAM alignment files, go to the next section on SAM/BAM files.Notes on STAR
STAR is very very fast - it will rip through 20 million reads in a matter of minutes if you have 20 cpus working for you. In fact, the longest part of the program is loading the index into memory. If you are aligning several experiments in a row, add the option "--genomeLoad LoadAndKeep" and STAR will load the genome index into shared memory so that it can use it for the next time you run the program. Also, converting the sam file into a sorted bam file will take much longer than aligning the data in the first place.
Example of Alignment with Tophat (not recommended)
Tophat is basically a specialized wrapper for bowtie2 - it manipulates your reads and aligns them with bowtie2 in order to identify novel splice junctions. It can also use given splice junctions/gene models to map your data across known splice junctions.
Step 1 - Build Index (takes a while, but only do this once):
This part is exactly the same as for bowtie2 - if you already made or downloaded an index for bowtie2, you can skip this step.
Step 2 - Align your RNA-seq data to the genome using Tophat
To use tophat to map this data, run the following command:
/path-to-bowtie-programs/tophat -o <output directory> -p <# cpu> </path-to-genome-index/prefix> <fastq file>
For example:
/programs/tophat -o TophatOutput/ -p 8 /programs/indexes/hg19 Experiment1.fastq
Paired-end Example:
/programs/tophat -o TophatOutputPE/ -p 8 /programs/indexes/hg19 Experiment1.r1.fastq Experiment1.r2.fastq
In the example above, we use 8 processors/threads. The tophat2 program contains a mix of serial and parallel routines, so more processors doesn't necessarily mean it will be finished much faster. In particular, if you are performing coverage based searchers, it may take a long time (multiple processors will not help). In general, if you have multiple samples to map, it's better to map them at the same time with separate commands rather than mapping them one at a time with mapping processors.
Tophat places several output files in an output directory. The most important is the "accepted_hits.bam" file - this is the alignment file that will be used for future analysis (more info here). There are additional files that can be useful, including a "junctions.bed" file with records all of the splice junctions discovered in the data.
Important Tophat Parameters:
--library-type <fr-unstranded | fr-firststrand | fr-secondstrand>
Describes which method was used to generate your RNA-seq library. If you used a method that doesn't produce strand specific signal (i.e. just sequencing a cDNA library), then select the fr-unstranded. If you use a stranded method that sequences the first DNA strand made (like a dUTP method), then use fr-firststrnad. If you use direct ligation methods, then fr-secondstrand. Correctly specifying the library type will help Tophat identify splice junctions.-G <GTF file>
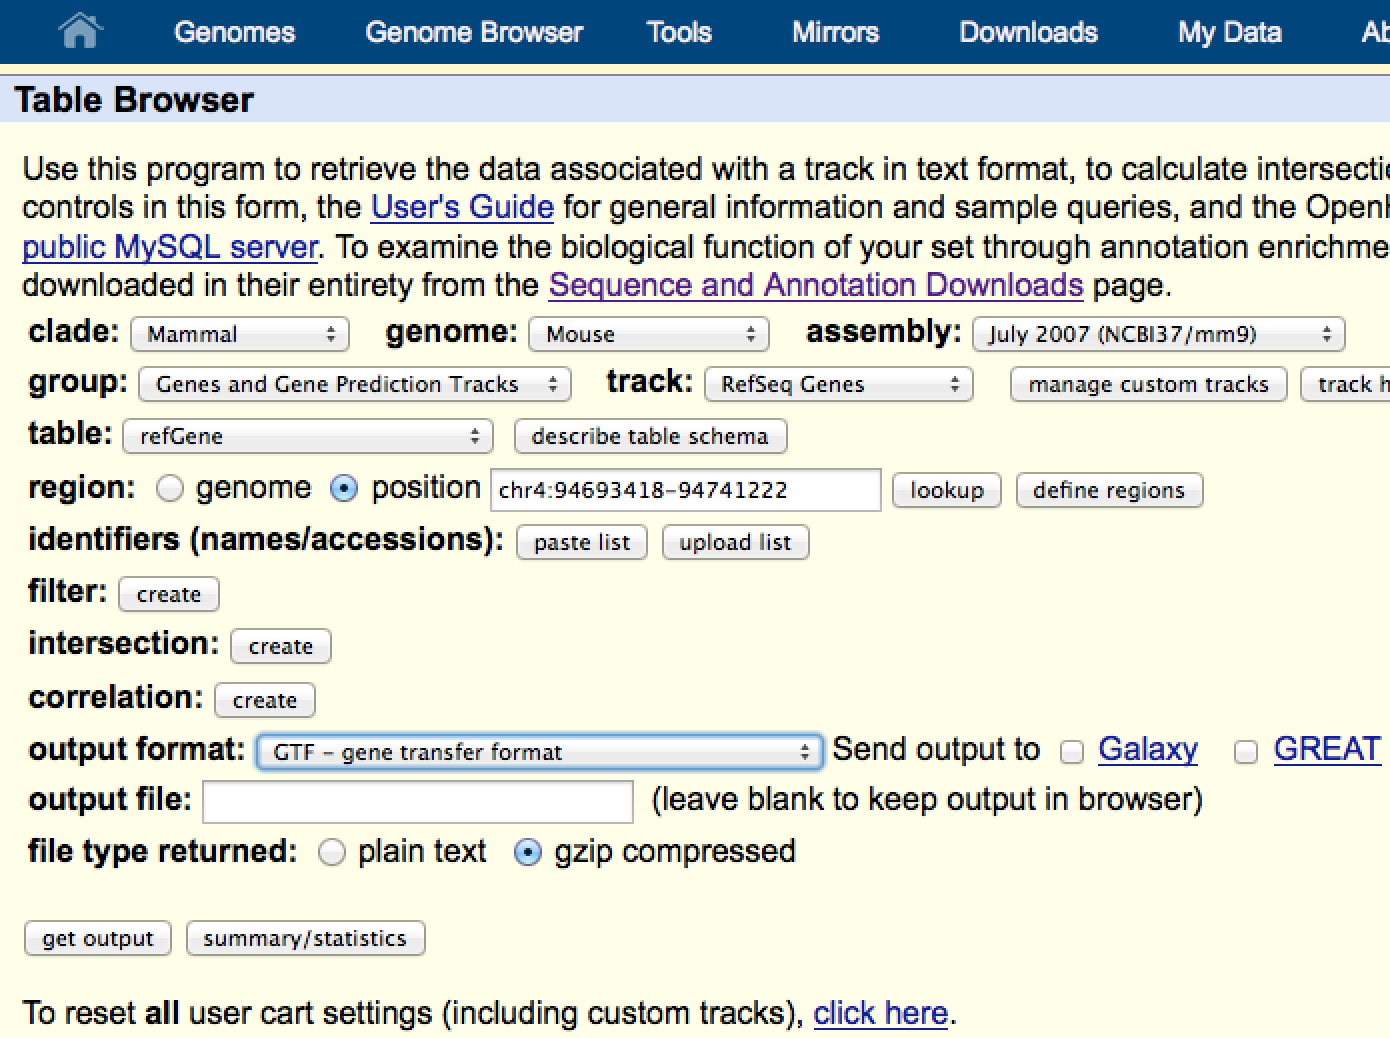
Use this option to specify a known transcriptome to map the reads against. By default, tophat will also search for de novo splice events, but this will help it known were the known ones are so that you don't miss them. A GTF files are called Gene Transfer Files, and a description of the format can be found here. To get a GTF file for your organism, you can usually get one from UCSC Table Browser:
In the output format, be sure to select GTF file - the file you download from here should work with tophat.
Tophat Mapping Strategy
If your goal is to identify novel transcripts and you have several separate experiments, I would recommend pooling all of your data together into a single expeirment/FASTQ file and mapping your data in one run. One of the ways Tophat tries to identify novel junctions is by first identifying "exons" by mapping segments of reads to the genome using bowtie2. The more segments it's able to map, the more confident it is about putative exons and the greater the chance it will identify unannotated splice sites.
You can then go back with your novel splice sites and remap the original experiments (not pooled) to get reads for each individual experiment using the "-j <raw junction file>". This is most useful for short reads. This general strategy is also useful if running cufflinks...
Mapping bisulfite-treated DNA
MethylC-Seq, BS-Seq, or RBBS-Seq data requires a special mapping strategy. In these experiments the genomic DNA is bisulfite treated, causing all unmethylated cytosines to be converted to uracil, which will utimately show up as thymine after sequencing. This is a clever way to figure out which cytosines are methylated in the genome, but requires a clever mapping strategy to avoid bias detection. I'll try to include an example of mapping this type of data in the near future, for now consider this list of BS-aligners.
De novo Assembly
Sometimes it makes more sense to perform de novo assembly instead of mapping reads to a reference genome. Assembly is well beyond the scope of this tutorial.
Genomics assembly from short reads: Velvet, SOAPdenovo

Can't figure something out? Questions, comments, concerns, or other feedback:
cbenner@salk.edu